FULFILLMENTS
The Fulfillments module is used to record the work performed. Thanks to this, you can have an overview of employeesߴ workload. The work on fulfillment can be invoiced.
The Fulfillments module can be found in the CDESK main menu, but also in other modules with which the Fulfillments cooperate. If the Fulfillments item is not in the menu, make sure that the module is enabled in Global Settings->Fulfillments and that you have set the appropriate permissions for using this module in Users and Groups -> Specific User / Group -> Permissions tab -> section Fulfillments. Access to the Fulfillments tab in other modules is also subject to permissions.
There are two types of fulfillments in CDESK:
- Fulfillments– have two types of use, depending on the system configuration:
- Simple fulfillments – used only for ordinary records of work performed, they are not linked to billing.
- Invoice fulfillments – all those linked to a deal with set billing; linked either directly or through a request assigned to the deal. Invoice fulfillments can provide billing of work performed in the scope of registered fulfillments, and also issue an invoice regarding additional transport or parking costs. To bill fulfillments, it is necessary to enable Deals module in Global Settings->Deals and set Billing in the deal.
- Internal fulfillments – used if you need to declare an agreed scope of fulfillments to customers, but for internal purposes you need to record the actual fulfillments performed. This function can be enabled in Global Settings->Fulfillments.
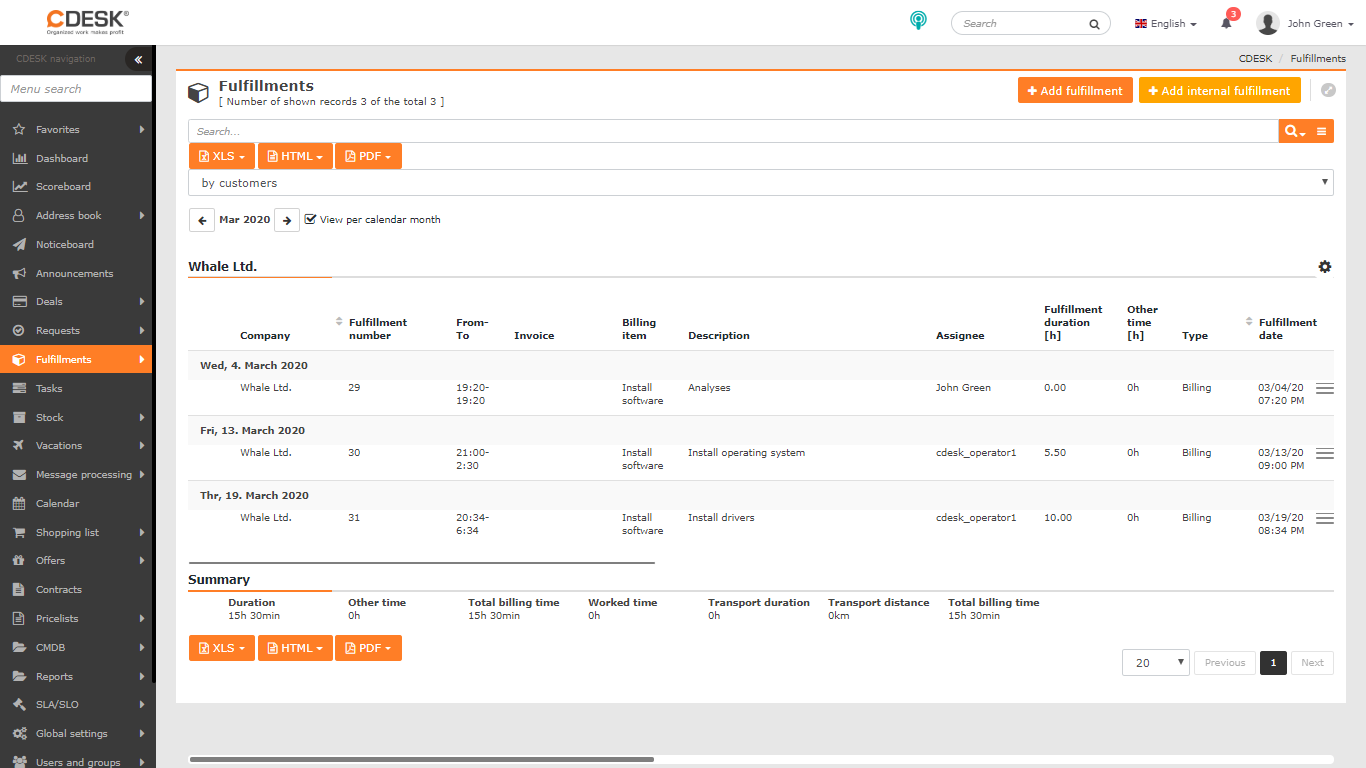
List of fulfillments
The window header informs about the number of displayed fulfillments from the total quantity. It contains controls for add a fulfillment, add an internal fulfillment, advanced search and export to XLS, HTML and PDF.
The ![]() tool is situated above the list. Use it to set which columns the list will contain. Click on the
tool is situated above the list. Use it to set which columns the list will contain. Click on the ![]() icon to open a new window with available columns. Click on a specific column to move it to the Selected Columns section. These are the columns that will appear in the List of fulfillments. Clicking on a column again will move that column back to the Available Columns section. The settings are saved by clicking the Confirm button in the lower left corner of the list. Its icon is also on the right edge of the list. Clicking the Cancel button closes the list without saving the settings.
icon to open a new window with available columns. Click on a specific column to move it to the Selected Columns section. These are the columns that will appear in the List of fulfillments. Clicking on a column again will move that column back to the Available Columns section. The settings are saved by clicking the Confirm button in the lower left corner of the list. Its icon is also on the right edge of the list. Clicking the Cancel button closes the list without saving the settings.

Fulfillments in the list are grouped by days, but it is possible to further group them by customers, customers – by accounting units, assignees or requests. It is possible to work with fulfillments directly in the list of fulfillments using the context menu ![]() – Edit, Create a copy, Add an internal fulfillment (only in case of the context menu of invoice fulfillments).
– Edit, Create a copy, Add an internal fulfillment (only in case of the context menu of invoice fulfillments).
The + button at the beginning of the fulfillment line indicates that internal fulfillments are registered under this fulfillment and can be displayed by clicking on it. The icon indicates that it is an internal fulfillment that is linked to an invoice one. If a checkbox is displayed next to fulfillment, it is an internal fulfillment not linked to any invoice fulfillment.
Search and filtering in the list of fulfillments
Above the list of services, there is a full-text search. It allows you to search according to the following categories: Company, Fulfillment Number, Description, Assignee and Used Material.
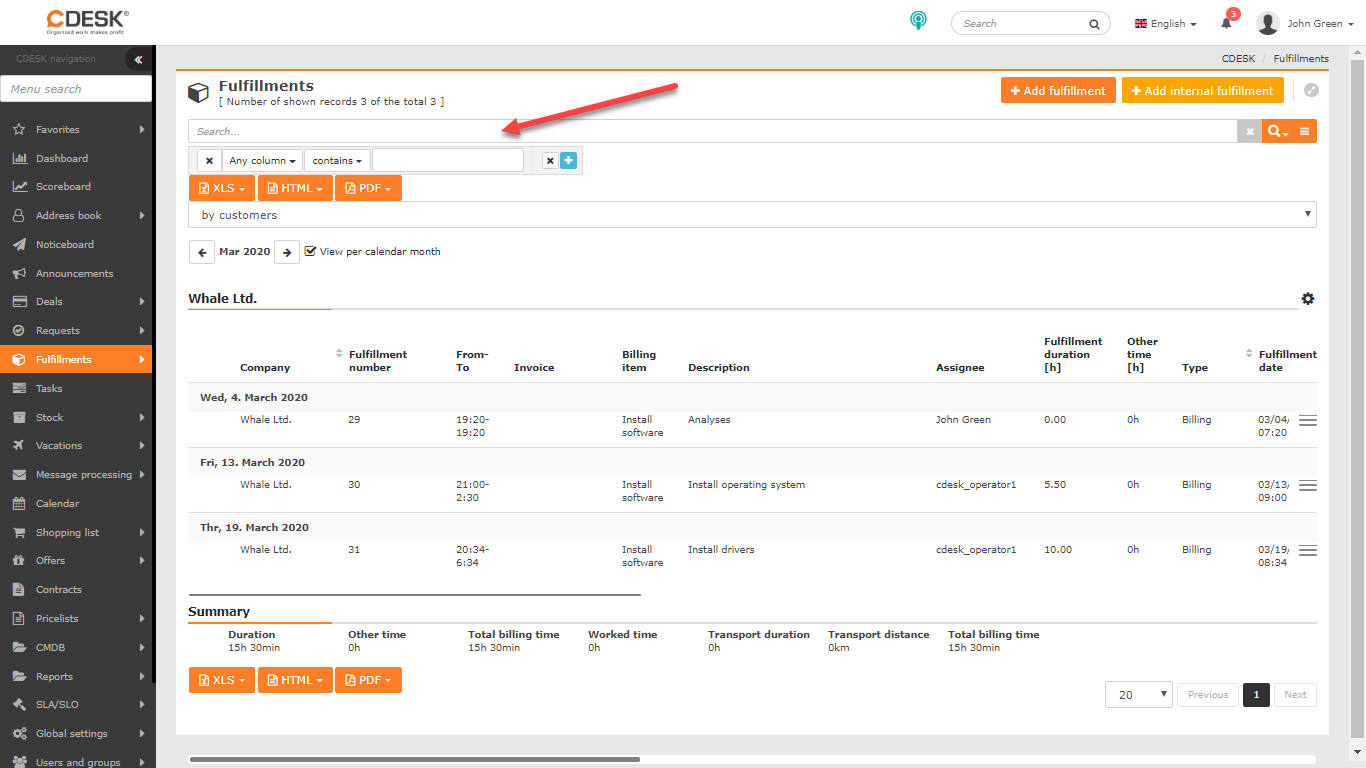
If it is necessary to search for fulfillments according to multiple criteria, an advanced search filter is used, in which it is possible to specify the following conditions:
- Any column
- Fulfillment number
- Date
- Invoice
- Invoice fulfillment
- Internal fulfillment
- Description
- Used material
- Request
- Work order
- Fulfillment for claim
- Assignee
- Company / Name
- Request status
- Duration (h)
- Type
- Billing item
- Task
- Start of fulfillment
- Deal

How to work with the search engine is described in detail in this text.
How to enter a new invoice fulfillment
You can create a new invoice fulfillment from the list of fulfillments by clicking on the +Add a fulfillment button, or directly in the request / task / deal / work order on the Fulfillments tab, by clicking on the + icon. The form to enter a fulfillment will open:
Basic information
Customer• – select a customer to whom the fulfillment applies. Next to the selection field, there is the ![]() icon to display the company details. The displayed form can be edited.
icon to display the company details. The displayed form can be edited.
Linked to• – select the type of object to which the fulfillment relates. In case of adding fulfillments directly from the request / task / deal / work order, the link is filled-in automatically.
- Customer – the fulfillment is linked to the customer you entered in the Customer field above. In case of a link to a customer, only global billing items from deals of the selected customer will be offered in the Billing section.
- Deal – selecting the option Deal opens a field for deal selection. The list shows only the deals assigned to the selected customer. Next to the selection field, there is the
 icon to display details of the deal. The displayed form can be edited.
 - Request – select Request to open the field for selecting a request. The list shows only the requests assigned to the selected customer. Next to the selection, there is the icon to display details of the request. The displayed form can be edited.
- Work Order – select Work Order to open the field for selecting a work order. The list shows only the orders assigned to the selected customer. Next to the selection field, there is the icon to display details of the order. The displayed form can be edited.
- Task – select Task to open the field for selecting tasks. The list shows only the tasks assigned to the selected customer. Next to the selection field, there is the icon to display details of the task. The displayed form can be edited.
Fulfillment text• – description of the fulfillment seen also by the customer.
Assignee• – the field is automatically pre-filled by the logged-in operator. Depending on the permissions, it is possible to create fulfillments for other operators. Checking the Create a copy of the fulfillment option will also open a field for selecting assignees for whom an identical copy of the given fulfillment will be created.

Start time• – select the start date and time of the fulfillment. If the simplified setup of time is enabled, enter the time duration in the nearby fields manually.
End time• – this field is offered only if simplified setup of time is disabled. Duration of fulfillments is calculated automatically based on the start and end time.
Other time – the data in this field is added to the duration of the fulfillment. The value can also be negative.
Location of fulfillment – allows selection of the place where the fulfillment was performed in case there are any defined in the CMDB Configuration Database for the customer. The transport can be pre-defined in the location settings. If you select such a place in the fulfillment, the transport in the fulfillment will be automatically pre-filled depending on the location.
Transport – if the transport is switched on, transport costs can be recorded in the fulfillment. When the switch is on, the following fields are available:
- Distance – distance traveled in kilometers.
- Duration – time required for transport in hours.
- Fixed price – numerical data on transport costs. This price is always the same regardless of the distance and time traveled.
- Parking price – numerical data on costs associated with parking.
Transport is invoiced according to the deal settings.
Fulfillments for claim – field intended to differentiate the work on claims statistically. If the request type is set as a request for change, the fulfillment is also automatically set as a fulfillment for claim (this setting can be turned off for each fulfillment). If the switch is in the on position, the fulfillment will not be invoiced, even if it is an invoice fulfillment. Fulfillment for claim in the list of fulfillments is color-coded yellow.
Used material – a text field in which you can enter the material used for the fulfillment. You can use this field, if you do not use stock issue cards and you only need a text record of the material used.
Warehouse Movements
Warehouse movements are used to create warehouse issue cards (material used to make a fulfillment). The warehouse movement can be invoiced via a deal. One fulfillment may contain more than one issue card.
This part is accessible only after saving the fulfillment and only if Stock Cards are switched on in the Global Settings. A new warehouse movement can be created using the + icon. After clicking, the form will open as when entering a new issue card.
You can use the > icon to link fulfillment to the already created issue card from the Warehouse Movements module.
Click to open a list of warehouse movements. Next to each item, there is the ![]() icon to mark one or more stock issue cards. Click the Add selected button to create a fulfillment link. Click Cancel to return to the fulfillment without adding selected items.
icon to mark one or more stock issue cards. Click the Add selected button to create a fulfillment link. Click Cancel to return to the fulfillment without adding selected items.
NOTICE: When creating a new fulfillment on the portal, the Warehouse Movements option will not be displayed until the fulfillment has been saved. Warehouse Movements can be added via the mobile application in a new draft fulfillment (it is not necessary to save it first).
Billing
Billing item – select the billing item defined on the linked Deal in the Billing tab. The billing item is used to define the type of work performed, for example, to distinguish between rates, unpaid claim work, contract work, etc.

Other
Internal description – fulfillment description intended for internal needs. This field is not available for customer accounts.
Attachments – possibility to attach attachments (such as photos, screenshots or documents). To add a file, drag it to this field, or click the field to search for and select a file from disk. Possible to add more attachments, the list of them will appear below the field.

Click on the Save button to create a new fulfillment.
Objects
The tab for selecting objects is displayed only after saving the fulfillment.

To add items, it is first necessary for the customer to define at least one group from the categories Devices, Catalog of operated services or General category in CMDB. If there are objects defined for the customer, click on +Add an item to add them to the fulfillment. The window for selecting objects by main group and CI type will open. Objects of the given category will be listed. Check the selected objects and click on the Add button to assign them to the fulfillment.
Click on the × button to remove objects from the fulfillment.

From the CMDB’s point of view, you can see in the object history all performed fulfillments on which the given object was located.
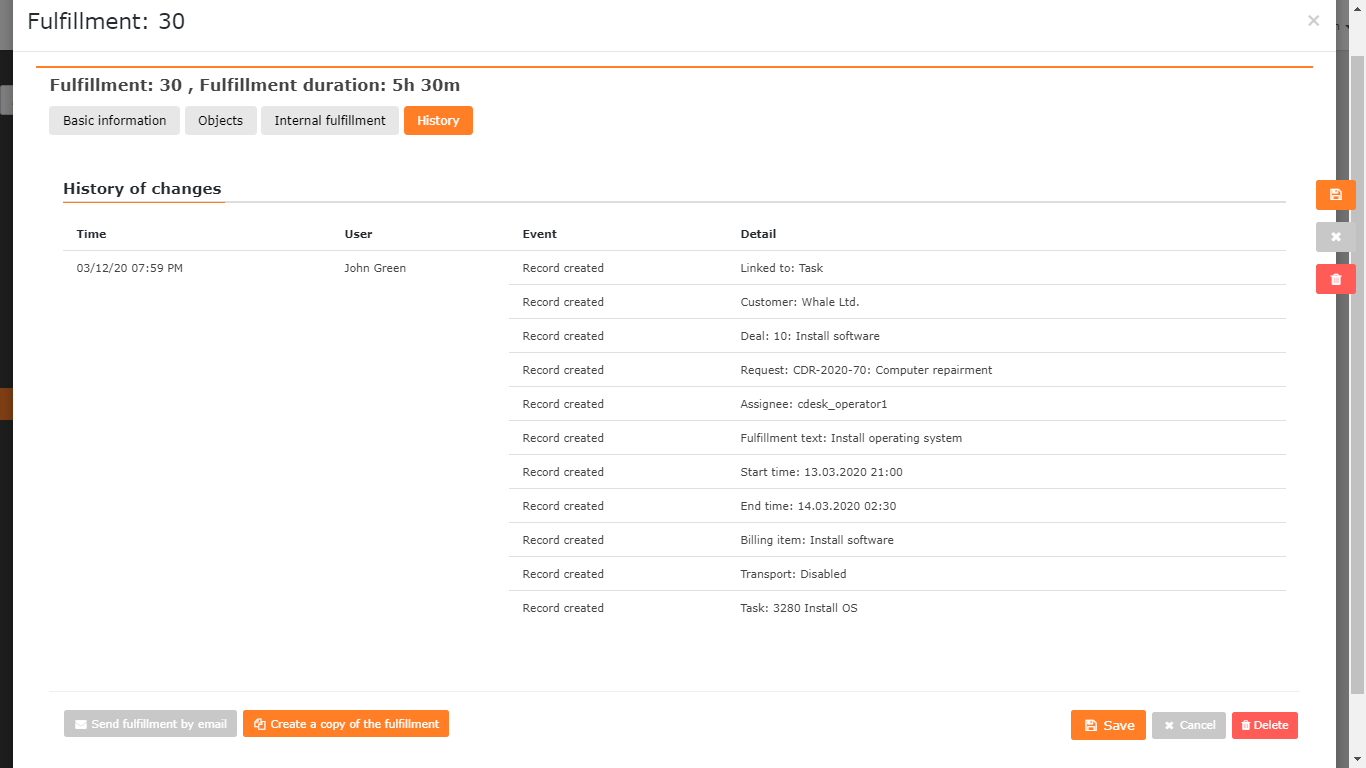
History of changes
After saving the fulfillment, the History tab becomes available. It can be enabled / disabled to certain users in permissions (Fulfillment-> Access to bookmarks-> History).
On the tab, you will find the information on creation and changes made to the fulfillment.
How to send a fulfillment by mail
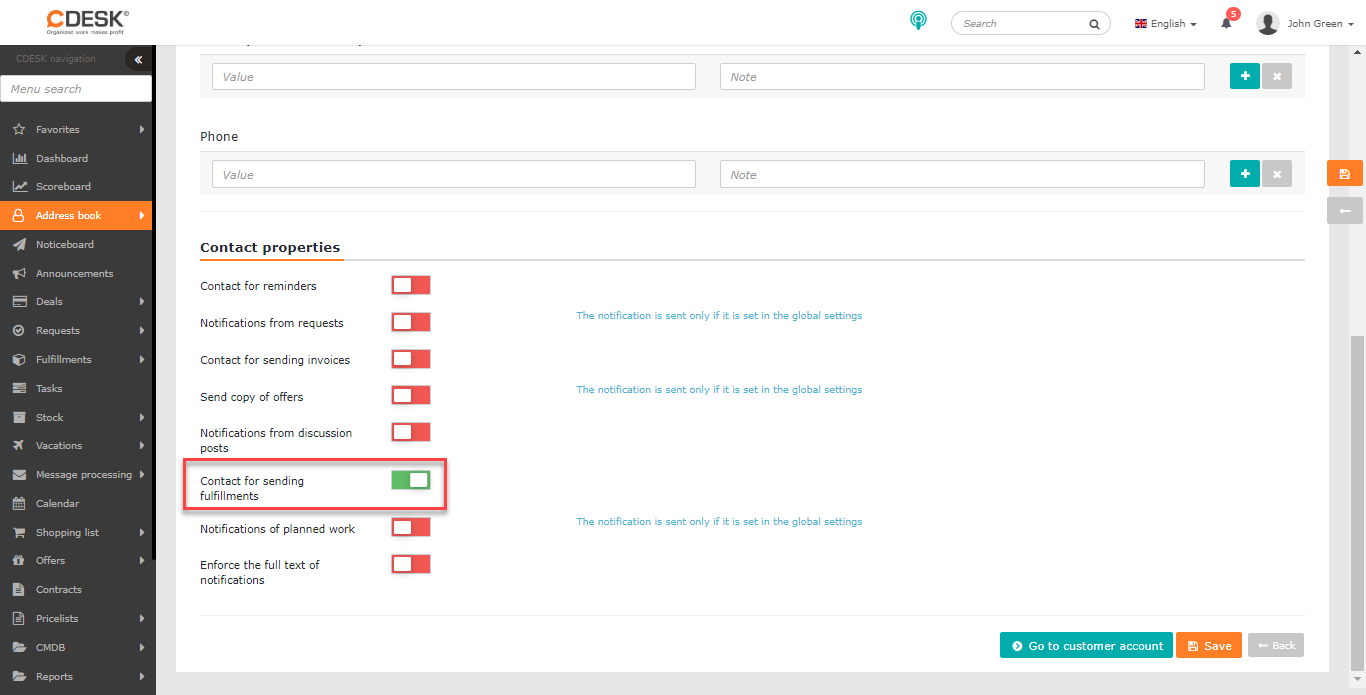
In the lower left corner of the fulfillment form, there is a button Send fulfillment by email, with which you can send a copy of the fulfillment to the specified e-mail. If you set a contact for sending fulfillments in the Contacts module, it will be pre-filled in the field.
Click on the button to open the list of users registered in CDESK. Selected users will be listed below. Use the x icon to remove them from the list. These users will be added to the Deleted list. You can add them back by clicking the + button.
In the field for receiving a copy you can enter any email.
A copy can be sent by clicking on the Send by email button.

How to create a copy of the fulfillment
In case you need to create a fulfillment with the most of the parameters identical to an already existing one, we recommend using the function of creating a copy of the fulfillment.
In the lower right corner of the fulfillment form, there is a Create a copy of the fulfillment button. Click to open the same form as when entering a new fulfillment with all items already pre-filled according to the original fulfillment. However, you can change them as you like.

Internal fulfillments
If your company – the service provider – distinguishes between the performed work and the invoiced work (for example, due to a real record of fulfillments that you would not want to show to the customer), you can activate the mode of distinguishing between internal and invoice fulfillments. Internal fulfillments are for customers hidden by default. You can change this setting in permissions.
In order to use this feature, it must be turned on in Global Settings->Fulfillments.
Internal fulfillments may be part of an invoice fulfillment or may exist separately. It is possible to make an invoice fulfillment from a separately created fulfillment. For more information, see the section Introduction to how to create invoice fulfillments from the internal ones in this text.
An internal fulfillment can be created:
- To an existing invoice fulfillment – from the list of fulfillments via the context menu
 or in the details of the invoice fulfillment in the Internal fulfillments tab.
 - Separately without the link to an invoice fulfillment – click on the +Add an internal fulfillment button in the upper right corner of the list of fulfillments. Then you do not have to set a link to any invoice fulfillment in the form.

In both cases, a form will be opened, the fields of which are described in more detail in the paragraph devoted to the creation of a new fulfillment.

Several internal fulfillments can be registered under one invoice fulfillment. Invoice fulfillments linked to internal fulfillments are listed in the list of fulfillments with the + button. Click to display the linked internal fulfillments.

Introduction to how to create invoice fulfillments from the internal ones
This functionality is used for simple processing of internal fulfillments by the responsible person, for creation of invoice fulfillments and for preparation for subsequent invoicing for the customer.
A separately created internal fulfillment is included in the list of fulfillments as well as an invoice fulfillment. From the rest of the fulfillments, it is differentiated by orange color.

There is a check box at the beginning of each line with internal fulfillments. It is there to check those internal fulfillments from which you want to create invoice fulfillments. After checking the selected internal fulfillments, the +Create a billing fulfillment from internal fulfillments and Cancel selection buttons will appear above the list of fulfillments. Click the Cancel selection to unmark the selected internal fulfillments.
After clicking on the +Create a billing fulfillment from internal fulfillments button, the form will open as when entering an invoice fulfillment, while most of the fields are already pre-filled, based on the parameters of the selected internal fulfillments. The meaning of each field is described in this section.
Click on the +Create a billing fulfillment from internal fulfillments button to open the form as when entering an invoice fulfillment, Most of the fields are already pre-filled according to the parameters of the selected internal fulfillments. The meaning of each field is described in this section.
Selecting a customer and setting up links work in the same way as when entering an invoice fulfillment.
Basic information
Fulfillment text• – it is taken from all internal fulfillments.
Assignee• – the field is automatically pre-filled by the registered operator. Depending on permissions, it is possible to create fulfillments for other operators. Check the option Create a copy of this fulfillment to other assignees automatically to open a field for selecting assignees who will get an identical copy of the fulfillment.
Start time• – the field is automatically pre-filled with the time from the internal fulfillment that started first. The time can be changed manually. If the simplified mode of time is enabled, fields to determine the total duration of the fulfillment appear. The fulfillment duration is automatically calculated from the duration of all internal fulfillments.
End time• – this option is offered only if the simplified time mode is disabled. This field is automatically pre-filled with the time from the internal fulfillment that ended last. The time can be changed manually. The fulfillment duration is calculated automatically based on the start and the end time.
Other time – the field is automatically pre-filled with the sum of other times from internal fulfillments, but can be changed.
Fulfillment location – internal fulfillments do not influence the selection of the fulfillment location, therefore it is not pre-filled. Click to choose a location, if there are any in the CMDB Configuration Database defined for the customer.
Transport – When the ![]() switch is turned on, the fields for transport records become available. All are pre-filled based on totals from internal fulfillments. However, you can change individual fields.
switch is turned on, the fields for transport records become available. All are pre-filled based on totals from internal fulfillments. However, you can change individual fields.
Fulfillments for claim – they are intended for statistical differentiation of work on requests for change. If the request type is set as a request for change, then fulfillments will also be automatically set as fulfillments for claim (this setting can be turned off for each fulfillment separately). If the switch is in the on position ![]() , the fulfillment will not be invoiced, even if it is an invoice fulfillment. The fulfillment for claim is color-coded yellow in the list of fulfillments.
, the fulfillment will not be invoiced, even if it is an invoice fulfillment. The fulfillment for claim is color-coded yellow in the list of fulfillments.
Used Material – a text field in which you can enter the material used for the fulfillment. You can use this field if you do not use stock item cards and you only need a text record of the material used. Used material from internal fulfillments is not transferred to this field.
Billing
Billing item – select the billing item defined in the linked deal in the Billing section. The billing item is used to define the type of work performed. Billing items can be created in the Deals module.
Other
Internal description – fulfillment description intended for internal needs. This field is not available for customer accounts. This description is not pre-filled based on internal fulfillments, so enter a new description if needed.
Attachments – attachments from internal fulfillments are not transferred to invoice fulfillments. To add a new file, drag it to this field, or click the field to search for and select a file from disk. It is possible to add more attachments, the list of attached files will then be displayed below this field.
Internal fulfillments
The Internal Fulfillments tab contains a list of internal fulfillments from which you can create invoice fulfillments.

Click on the Save button to create a new fulfillment. Once saved, additional fields and tabs become available. Their significance is described in the section about entering an invoice fulfillment.
Example of creating invoice fulfillments from the internal ones in the request followed by invoicing through deals
Create a deal. Create a request. Select the required deal in the request. Then create multiple tasks on the Tasks tab in the request.

Then assign multiple internal fulfillments to each task. These fulfillments can be seen in the request in the Fulfillments tab, sorted by tasks.

A single invoice fulfillment can be created from these internal fulfillments. Check all internal fulfillments to make the +Create a billing fulfillment from internal fulfillments button available. Click to open a new form as when entering an invoice fulfillment. The individual fields are filled with parameters from internal fulfillments and the times are sums from the internal fulfillments. You can find more about the automatic filling of fields depending on internal fulfillments HERE.

The Internal Fulfillments tab contains a list of internal fulfillments from which you can create an invoice fulfillment.
Use the Save button to save the invoice fulfillment.

Go to the Deals module.Find the deal you selected in the request in the list. The invoice fulfillment created from the internal fulfillments in the request can be found on the Fulfillments tab.

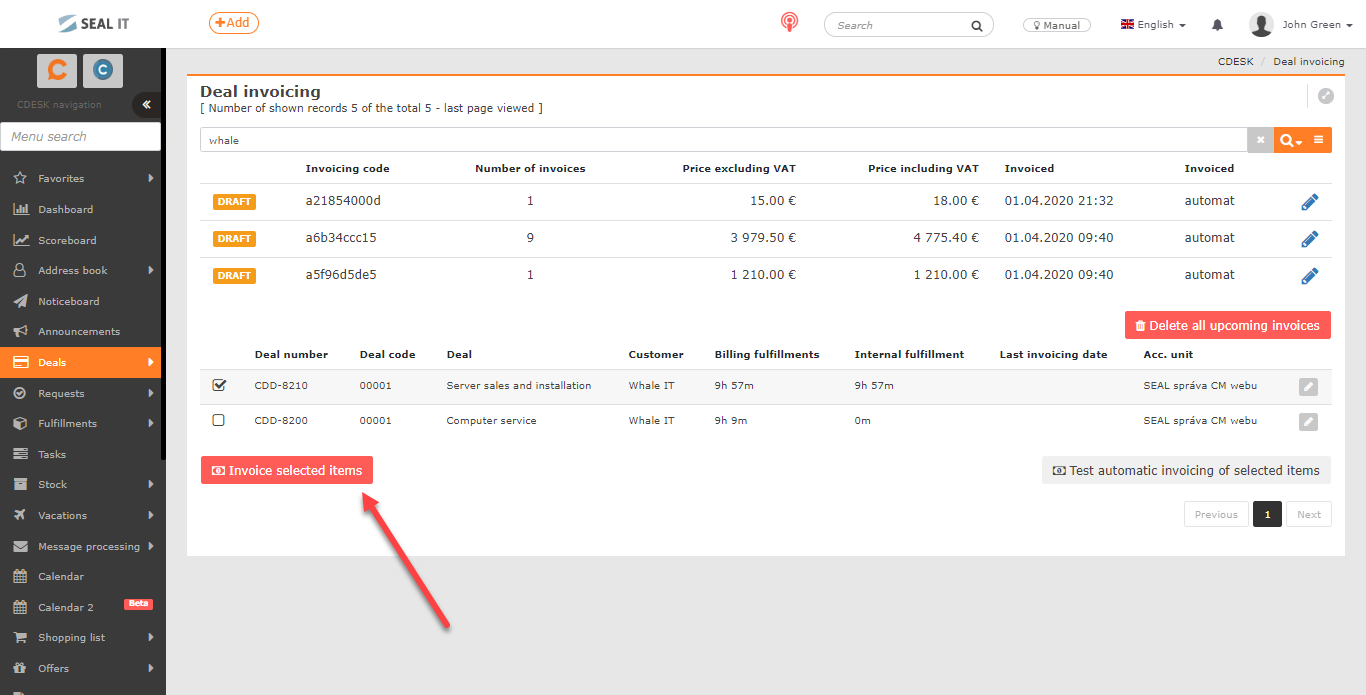
Go to the Deal Invoicing module. In the list, find the deal you selected in the request. Mark the deal and choose the option Invoice selected items.
Then a new window will open, where you can set the date on which the deal will be invoiced. Once you have selected a date, click the Invoice overview button.

In the invoice overview, click Create tax documents button in the lower left corner.

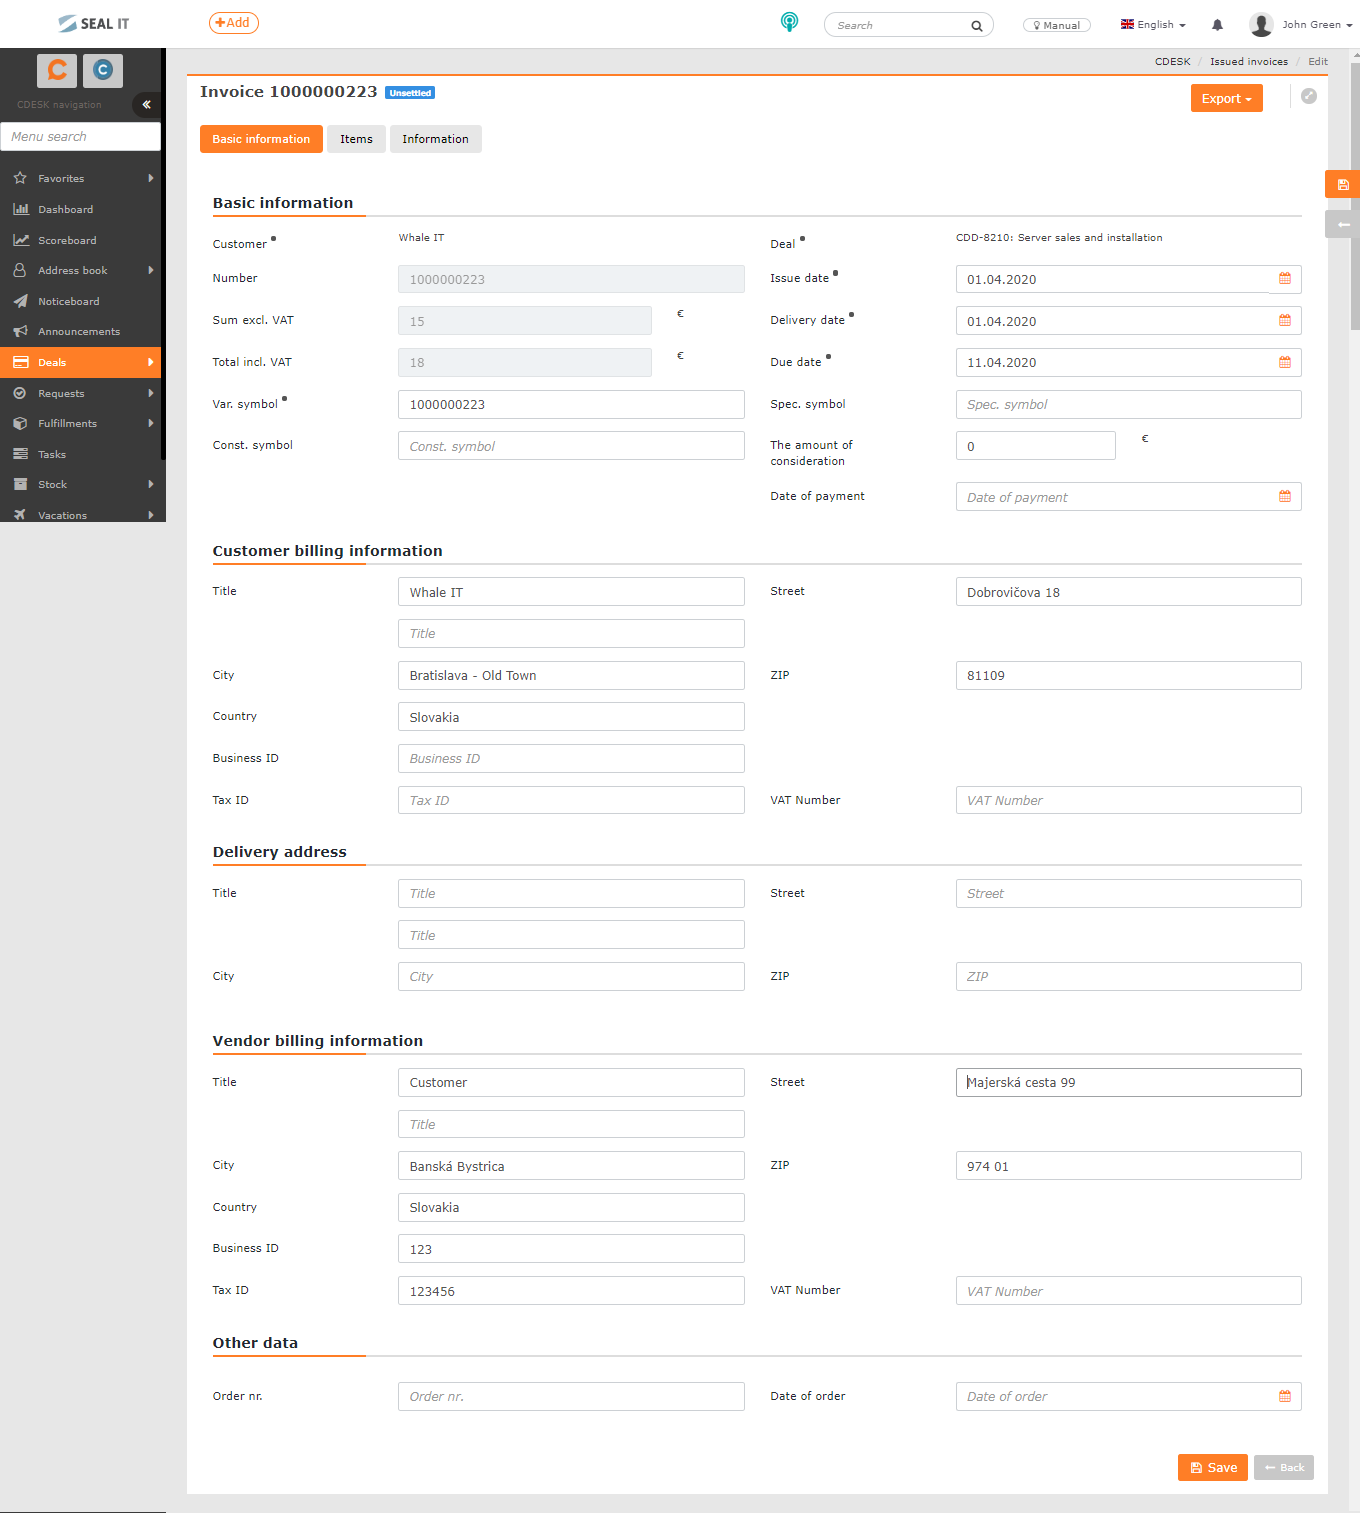
You will then be automatically redirected to the Issued Invoices module. Find the invoiced deal in the list. Click to open the invoice with the option to export to PDF or HTML format.
Export of fulfillments
Fulfillments can be exported in three different formats – XLS, HTML and PDF. The export buttons are located above the list of fulfillments. You can enable / disable it to certain users in permissions (in Permissions-> Fulfillment-> Export).
XLS
Use the XLS button to export fulfillments to XLS format. Click to enable the buttons Data Export and Operators & Companies Report.
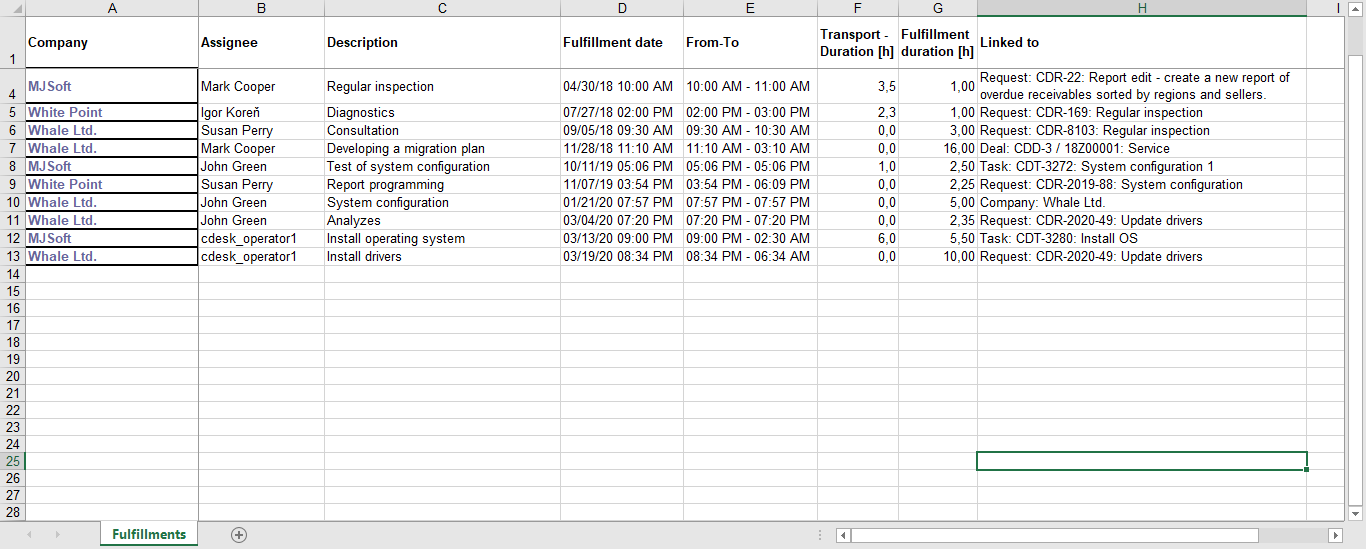
When you select the Data Export option, you can choose which columns will be in the exported table. Click the Export button to export the table. Select Cancel to return to the list of fulfillments without exporting items. The Data Export button exports only those items that are currently displayed in the list. They can be grouped according to your settings.
When selecting Operators & Companies Report, you do not select columns to export. The report contains a list of all companies. Each of them is assigned the times from fulfillments divided by operators. This export does not take into account which items are currently displayed in the list of fulfillments.

HTML
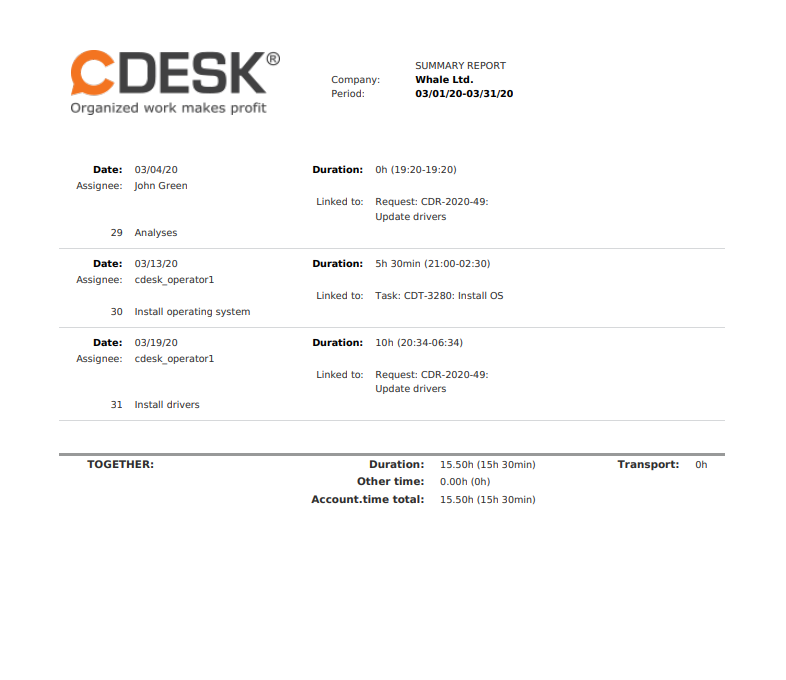
Select the HTML option to export fulfillments to HTML. Two options appear: Listing with a column header and the Summary report. With both options, only the items currently displayed in the list are exported. They can be grouped according to your settings.
When you select the Listing with a column header option, you get an export that is identical to the layout of the displayed list of fulfillments. At the beginning, however, you can choose which columns will be in the export. After selecting the columns, click the Export button. The export will be displayed on a new tab in your internet browser. Select Cancel to return to the list of fulfillments without exporting items.

The Summary report contains information on the total times of fulfillments, while you choose which data will be included in the fulfillment. After selecting columns, select the Export option. The fulfillment will open in a new window of your internet browser. Select Cancel to return to the list of fulfillments and the report will not be created.
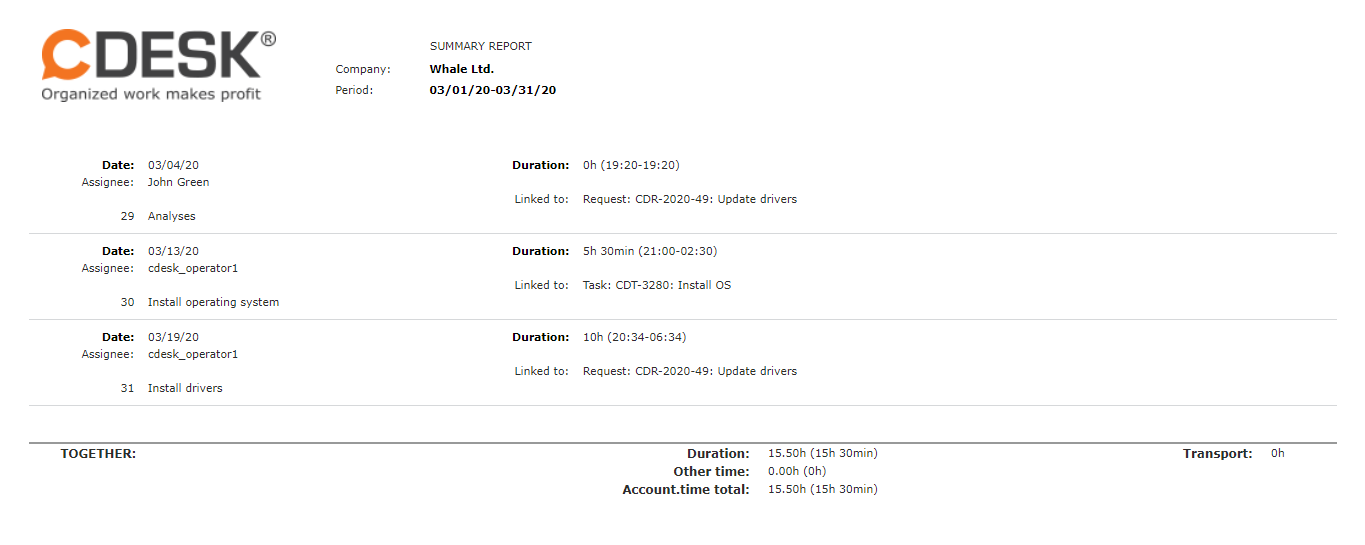
To export fulfillments to the PDF format, click the PDF button. Two options will appear: Listing with a column header and Summary report. With both options, only the items currently displayed in the list are exported. They can be grouped according to your settings.
When you select the Listing with a column header option, you get an export that is identical to the layout of the displayed list of fulfillments. At the beginning, however, you can choose which columns will be in the export. After selecting columns, click the Export button. If you want the grouped items to be in separate documents, select the option Divide into separate PDFs by group. This option is located next to the export button. Select Cancel to return to the list of fulfillments without exporting items.

The Summary Report contains information on the total times of fulfillments and it is up to you to choose which data will be included in the fulfillment. After selecting columns, select the Export option. If you want the grouped items to be in separate documents, select the Divide into separate PDFs by group option. This option is located next to the export button. Select Cancel to return to the list of fulfillments and the report will not be created.